Building Model Airplanes occupied for me a number of very pleasant childhood hours. Hours turned to days turned to a beautiful model to show for the investment of time.
And it is an investment.
Each newly built model gains positively from the experience of having built all models previous.
This used to be a very popular hobby. So popular that in the 60's you could walk into practically ANY variety store and find a few shelves of kits from which to choose the next project. ("What's a *variety* store ?" I guess that these days chain Drug Stores have become the new variety store carrying a limited selection of goods from a broad set of categories).
Fast forward to today and even a full blown specialized Hobby Store might NOT have ANY Scale Flying Model Airplanes in the store. It's really a shame because the patience and craft developed in the act of building these things is really a satisfying set of skills to have because they can bleed over into just about any kind of precision construction task in which you might want to engage.
This kind of activity: actually producing something by construction from raw materials and specifically NOT by assembling prefabricated parts seems to have risen in the last decade(+) or so.
The new name associated with this kind of activity is that is is work done by a 'Maker'.
In the mainstream USA of those born in the 50s and 60s. 'Maker' didn't exist because practically every school age male took 'shop class'. There was nothing special about being a 'Maker' back then, because every junior high school male was a Maker (maybe some girls too, but it was required of the boys). Yah, the tax payers that provided me the gift of public school paid for me to learn how to be a 'Maker'. Have to pay for that yourself today.. (NOTE: being a pre-modern new male, in addition to the shop classes, I also signed up for the 'Girls Home Economic' cooking classes back then as well, I took a little heat for that).
My previous model building experience boosted me to the front of the wood and metal shop classes since the basics of careful fabrication and construction had already been learned.
The shop classes took it the next step towards the real world though.
The most memorable project of my metal shop class was to make a chisel. A real usable chisel.
Gen-U-wine Chisel Recipe:
1. Take a rod of high carbon tool steel and cut yourself a 4 inch cylinder section (use a manual saw, very tiring. I think this was to impress upon us just how much work using an electric tool is saving you).
2. Heat the cylinder in a forge up to red-orange hot. The steel is now malleable. Holding the piece with tongs using one hand, use a hammer in your other hand to beat the end of the cylinder into a symmetrically tapered gradually flattened shape. This is the 'chisel' end that will do the chiseling.
This can't be done in one go because the steel cools too quickly, so you have to reheat and shape the piece over a number of separate heating and shaping cycles (I think it took me about 10 rounds of heating and beating to get it to the shape that I wanted).
3. With the basic shape set, now the piece is filed/grinded into it's final shape.
A 'V' shaped edge at the chisel end for cutting, a beveled edge around the circumference of the cylindrical opposite side, the 'hit with a hammer' side. The bevel is there so that you cannot accidentally break and send off a dangerous flying projectile when you hit the chisel with a hammer.
4. Do some progressive rough to fine polishing so that the chisel has a smooth good looking finish.
5. Now you have a piece of shaped steel that looks like a chisel, but it's an imposter.
If you try to use the 'chisel' now, you'll just bend big notches in what was your edge and you might also shatter the chisel into pieces.
The edge is too soft to cut anything without losing its shape and the steel may also have brittle sections that cannot stand up to stress without breaking.
So now you have to temper the steel so that it is resilient like a spring and will be able to absorb and return the impacts from hammer blows.
Tempering is done by heating the steel to a specific temperature, partially quenching it into banded sections of graduated temperature by quickly dipping and pulling out the heated chisel into water at different depths. The in air cooling of the entire chisel is now watched very carefully. At the proper time during the cooling (it doesn't take long, only 10 seconds or less), you quench the entire piece completely by dropping it into the bucket of cooling water. If you've done this correctly, the chisel now has the springy temper that will allow it to transmit the hammer blows without damage to the chisel.
6. Now you must harden the cutting end of the chisel so that it will cut through 'normal steel'. This is done by carbon case hardening. (you might notice that the shackles of some padlocks are stamped with the words 'case hardened' on them, this is the same kind of hardening. On a padlock, this makes the shackle harder to cut (hence a preferred tool of thieves is often a grinder)).
7. NOW if you've done everything correctly you might have a chisel .
In order to get a passing grade you have to prove that you have made a real chisel.
This is done by a very pleasing (I think) test:
Take the original rod of tool steel that was the source of the raw steel for your chisel and place your chisel on the end of it.
Strike your chisel hard with a hammer (better wear eye protection for sure).
If you really have a chisel and not an imposer, your chisel will cleanly whack off a section of the original tool steel rod without ANY noticeable change in the appearance of the chisel and you will be able to do this repeatedly with the same results.
To be sure:
YOU HAVE MADE SOMETHING THAT IS STRONGER THAN THE ORIGINAL MATERIALS THAT YOUR PIECE WAS MADE FROM
You're a Maker.
In that shop class, every boy is a Maker.
In that Junior High School every boy is a Maker.
Where was I ?
Oh, yeah Model Airplane Building.
So the cool thing about building model planes is that not only are they scaled down versions of real planes, they are also aerodynamic in their own right and will fly.
In practice slight modifications to proportion may be done to make the model more flyable.
Q: Why isn't an exact scaled down replica as flyable/stable as the original plane ?
A: Because while you can scale down the proportions of the plane exactly, the air is NOT scaled down to match the model. Aerodynamics depend on the bulk properties of air molecules. Bulk properties depend on amounts. The amount of air flowing over a real wing is not the same amount of air that is flowing over a model wing so the flight characteristics will be altered (consider the viscosity of air, for example).
Happily, for model buffs. Many exact scale planes work well enough, and for many more slight alterations to the designs can improve the flight characteristics immensely. An example: adding a little more 'V' to shape of a wing when looked at from the front of the model (the dihedral) can offer a big increase in the flight stability of the model plane at a slight cost to the 'true to scale-ness'.
In a few pics here are a few very pleasing aesthetics of wood and paper model airplanes.

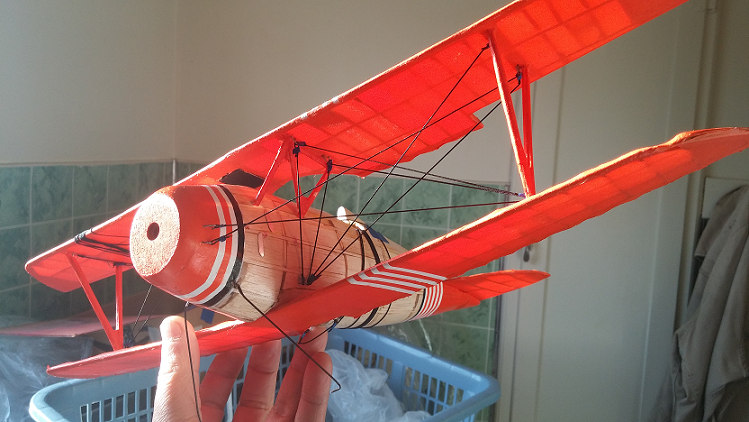
These pictures are of a build-in-progress German WW1 Albatros D5 from the Dumas Model Kit company. While the plane is from a kit, it is not an 'assemble from prefabricated parts' project. The model is built up from raw materials included in the kit. The convenience the kit is that it provides the design/plans and the raw materials required, all in one convenient package.
The body, or fuselage, of the plane is made entirely of wood. Shaped pieces of wood 'skin' have been glued on to the outside of its wooden frame. I'm leaving most of the body unpainted so that its beautiful wood grain is plain to see.
Above, the partial wings and tail can be seen to have wooden frames that have been covered in tissue paper and painted.

Above, one of my favorite things about tissue covered wings, especially the wings of many WW1 aircraft are the smooth compound curved shapes of the stretched paper over the frames. The graceful rise and fall shape of the smooth and taught paper skin appear only after the paper has been shrunken by a sequence of wetting and drying. It's always a pleasure to see it magically come to shape 'on it's own' as it dries.
The tissue covering shrinking process.
Below, this is a wing (from a different model) that is about to have a loose covering of tissue paper glued to it.

Below, now the glued on tissue is lightly sprayed with water which loosens the paper up even more giving a very baggy appearance.

Below, as the paper dries the tissue shrinks which causes the paper to hug the frame evenly. To seal the paper against absorbing any moisture from the atmosphere after we have completed a cycle of wetting and shrinking we paint the surface with dope (yes, it's the real name of a real substance). This also gives the paper a nice translucent appearance through the thinner regions of the paper grain.
It's so lovely !

Per the dominant technology of the time, many WW1 planes required external wire cable bracing to keep the structure from coming apart from the stresses of flight. These cables are represented in this model by elastic thread which I've thread through anchor points on the body and wings. The cables on the model are for scale appearance only and add no actual structural stability. If I were to make this a model optimized for flight, I'd leave off the fake cables because they would only detract from flight by adding more aerodynamic drag.

I'll probably post a bit more about these things later...
No comments:
Post a Comment